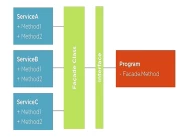
Trong bài viết này, tôi sẽ hướng dẫn các tạo cách Export hoặc Import CSV trong Laravel. Nhưng thay vì chỉ viết hàm đơn thuần trong PHP thì tôi sẽ hướng dẫn các tạo ra một Service trong Laravel bằng cách sử dụng Facades, chúng ta sẽ dễ dàng mang mã nguồn từ dự án qua dự án khác để tái sử dụng tiết kiệm thời gian trong quá trình phát triển dự án. Tôi thấy nó rất có ích, nên tôi muốn giới thiệu nó đến cho mọi người.
Đầu tiên, chúng ta sẽ tạo một thư mục tên là Services trong thư mục app (tức là app/Services) trong project Laravel của bạn.
Bên trong thư mục này, chúng ta sẽ tạo một file PHP có tên là CsvServices. Bạn hãy mở file và chỉnh sửa như sau:
<?php

namespace App\Services;

class CsvServices
{
    /**
     * Generate CSV file
     * @param $filename
     */
    public function create($filename) {
        $csv_file_path = storage_path('app/'.$filename);
        $result = fopen($csv_file_path, 'w');
        if ($result === FALSE) {
            throw new Exception('Failed to write the file.');
        } else {
            fwrite($result, pack('C*',0xEF,0xBB,0xBF)); // Add BOM
        }
        fclose($result);

        return $csv_file_path;
    }

    /**
     * Load CSV file
     * @param $filepath
     * @param $records
     */
    public function load($filepath, $mode = 'utf8')
    {
        // File existence check
        if(!file_exists($filepath)) {
            return false;
        }

        // Define PHP filter so that it can be read while converting the character code
        if($mode === 'sjis')  {
            $filter = 'php://filter/read=convert.iconv.cp932%2Futf-8/resource=' . $filepath;
        } elseif ($mode === 'utf16') {
            $filter = 'php://filter/read=convert.iconv.utf-16%2Futf-8/resource=' . $filepath;
        } elseif($mode === 'utf8') {
            $filter = $filepath;
        }

        // CSV load using SplFileObject()
        $file = new \SplFileObject($filter);
        if($mode === 'utf16') {
            $file->setCsvControl("\t");
        }
        $file->setFlags(
            \SplFileObject::READ_CSV |
            \SplFileObject::SKIP_EMPTY |
            \SplFileObject::READ_AHEAD
        );
        return $file;
    }

    /**
     * Export to CSV file
     * @param $filepath
     * @param $records
     */
    public function write($filepath, $records) {
        $result = fopen($filepath, 'a');

        // Write to file
        fputcsv($result, $records);

        fclose($result);
    }

    /**
     * Read CSV file Without CallBack
     * @param $filepath
     * @param $records
     */
    public function readWithoutCallBack($filepath, $mode = 'utf8')
    {
        $file = $this->load($filepath, $mode);
        // Process each line
        $records = array();
        foreach ($file as $i => $row)
        {
            // Import the first line as a key header line
            if($i===0) {
                foreach($row as $j => $col) {
                    $colbook[$j] = $col;
                }
                continue;
            }

            // Import the second and subsequent lines as data lines
            $line = array();
            foreach($colbook as $j=>$col) {
                $line[$colbook[$j]] = @$row[$j];
            }
            $records[] = $line;
        }
        return $records;
    }

    /**
     * Read CSV file With CallBack
     * @param $filepath
     * @param $records
     */
    public function readWithCallBack($filepath, callable $callback, $mode = 'utf8')
    {
        $file = $this->load($filepath, $mode);
        // Process each line
        $records = array();
        foreach ($file as $i => $row)
        {
            // Import the first line as a key header line
            if($i===0) {
                continue;
            }

            // Import the second and subsequent lines as data lines
            call_user_func($callback, $row);
        }
        return $records;
    }

    /**
     * Delete CSV file
     * @param $filename
     */
    public function purge($filename) {
        return unlink(storage_path('app/'.$filename));
    }
}
Tiếp theo, chúng ta sẽ đăng kí CsvServices trong service provider.
Bạn có thể tạo một service provider mới hoặc chỉ cần thêm CsvServices vào app/Providers/AppServiceProvider.php
public function register()
{
    $this->app->singleton('CsvServicesAlias', function ($app) {
        return new \App\Services\CsvServices;
    });
}
Bây giờ, chúng ta sẽ tạo một thư mục có tên là Facades trong thư mục app (tức là app/Facades) trong project Laravel của bạn.
Bên trong thư mục này, chúng ta sẽ tạo một file PHP có tên là CsvServicesFacade. Bạn hãy mở file và chỉnh sửa như sau:
<?php

namespace App\Facades;

use Illuminate\Support\Facades\Facade;

class CsvServicesFacade extends Facade
{

  protected static function getFacadeAccessor()
  {
    return 'CsvServicesAlias';
  }
}
Tiếp theo, chúng ta sẽ đăng kí alias cho CsvServicesFacade trong config/app.php. Bạn hãy mở file config/app.php và thêm CsvServicesFacade trong array aliases.
'aliases' => [
    ...
    'Csv' => App\Facades\CsvServicesFacade::class
],
Như vậy đến bước này, chúng ta đã hoàn thành việc tạo Service CSV trong Laravel bằng Facades, thật dễ dàng phải không nào?
Tiếp theo, tôi sẽ hướng dẫn mọi người cách sử dụng các function trong Service CSV mà chúng ta vừa tạo ra ở trên.
Trước tiên, chúng ta hãy thực hiện chức năng Export CSV
<?php

namespace App\Http\Controllers;

use Illuminate\Http\Request;
use Csv;

class PhotoController extends Controller
{
    public function export ()
    {
        // Dữ liệu xuất csv
        $lists = [
            ['ManhDanBlogs', 'ManhDanBlogs'],
            ['ManhDanBlogs', 'ManhDanBlogs'],
        ];

        $filename = 'demo.csv';
        $file     = Csv::create($filename);

        // Write header csv
        Csv::write($file, ['header1', 'header2']);

        // Write dữ liệu xuất csv
        foreach ($lists as $list) {
            Csv::write($file, $list);
        }

        $response = file_get_contents($file);

        // Xóa file csv
        Csv::purge($filename);

        return response($response, 200)
                 ->header('Content-Type', 'text/csv')
                 ->header('Content-Disposition', 'attachment; filename='.$filename);
    }
}
Cuối cùng, chúng sẽ sẽ thực hiện chức năng Import CSV
<?php

namespace App\Http\Controllers;

use Illuminate\Http\Request;
use Csv;

class PhotoController extends Controller
{
    /**
     * Display a listing of the resource.
     *
     * @return \Illuminate\Http\Response
     */
    public function import()
    {
        // Cách 1: Sử dụng readWithoutCallBack trong servive
        $filepath = public_path('demo.csv');
        $data     = Csv::readWithoutCallBack($filepath);
        dd($data);

        // Cách 2: Sử dụng readWithCallBack trong servive
        $filepath = public_path('demo.csv');
        Csv::readWithCallBack($filepath, function ($item) {
            dd($item);
        });
    }
}
Tôi hy vọng bạn thích hướng dẫn này. Nếu bạn có bất kỳ câu hỏi nào hãy liên hệ với chúng tôi qua trang contact. Cảm ơn bạn.


