
GitLab
GitLab là kho lưu trữ Git dựa trên web cung cấp các kho lưu trữ mở và riêng tư miễn phí, các khả năng theo dõi vấn đề và wiki.
Đây là một nền tảng DevOps hoàn chỉnh cho phép các chuyên gia thực hiện tất cả nhiệm vụ trong một dự án từ lập kế hoạch dự án và quản lý mã nguồn đến giám sát và bảo mật.
Ngoài ra, nó cho phép các nhóm cộng tác và xây dựng phần mềm tốt hơn.
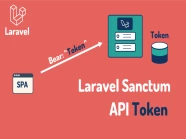
Thực hiện chức năng Login GitLab trong Laravel
Ngoài xác thực dựa trên biểu mẫu điển hình, Laravel cũng cung cấp một cách đơn giản và thuận tiện đó là sử dụng Laravel Socialite để xác thực với các nhà cung cấp OAuth.
Laravel Socialite hiện hỗ trợ xác thực qua các nhà cung cấp OAuth như: Facebook, Twitter, LinkedIn, Google, GitHub, GitLab và Bitbucket.
Trong bài viết này, tôi sẽ hướng dẫn các bạn cách sử dụng Laravel Socialite để thực hiện đăng nhập qua GitLab.
GitLab Client ID and Secret
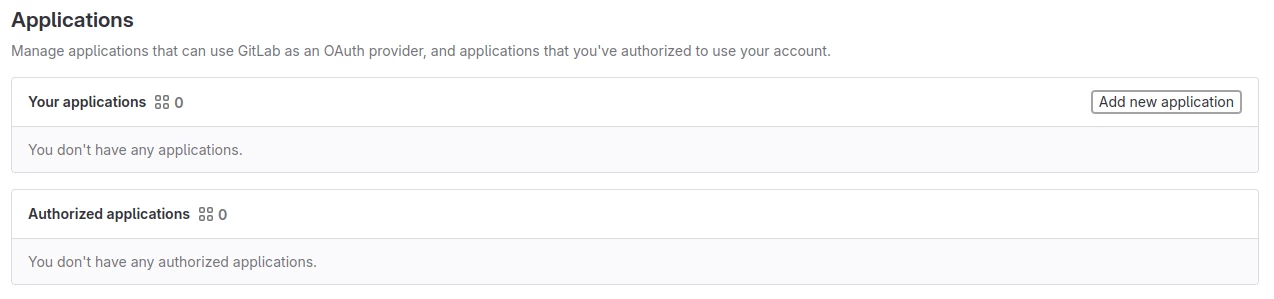
Bước 1: Đăng nhập GitLab và truy cập trang GitLab Applications
Bước 2: Màn hình Applications, bạn hãy nhấn nút Add new application:
Bước 3: Mục thông tin Name và Redirect URL trong phần Add new application:
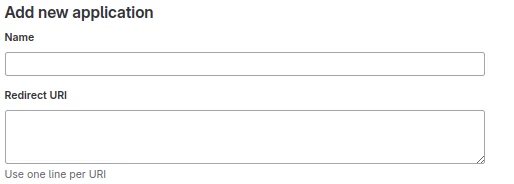
Bước 4: Mục Scopes, tích chọn read_user để ứng dụng có thể đọc được thông tin người dùng:

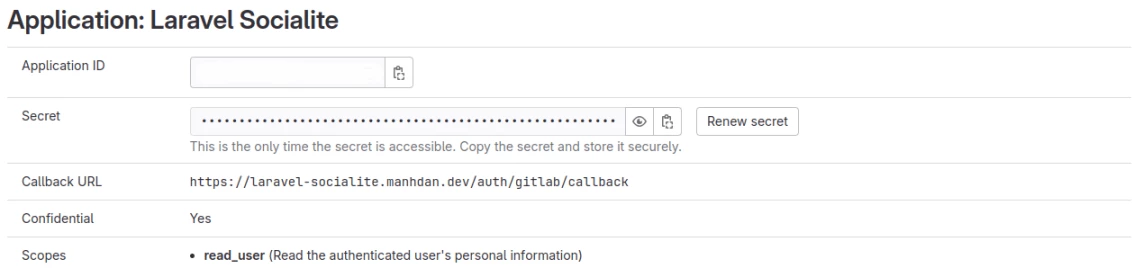
Bước 5: Nhấn nút Save application và chờ trong vài phút chúng ta sẽ có được thông tin Application ID và Secret như sau:
Cài đặt chức năng Login GitLab trong Laravel
Khởi tạo dự án Laravel
Đầu tiên, chúng ta sẽ khởi tạo dự án Laravel mới. Bạn có thể làm điều này bằng cách sử dụng lệnh sau:
composer create-project --prefer-dist laravel/laravel laravel_socialiteBước tiếp theo, chúng ta sẽ tiến hành kết nối đến cơ sở dữ liệu bằng cách chỉnh sửa các thông tin sau trong tập tin .env:
DB_CONNECTION=mysql
DB_HOST=127.0.0.1
DB_PORT=3306
DB_DATABASE=laravel_socialite
DB_USERNAME=root
DB_PASSWORD=
Cài đặt Jetstream trong Laravel
Đầu tiên, để bắt đầu, chúng ta cần cài đặt thư viện Jetstream bằng cách chạy lệnh sau:
composer require laravel/jetstreamTiếp theo, chúng ta tiến hành cài đặt Jetstream với Livewire bằng lệnh sau:
php artisan jetstream:install livewireSau khi cài đặt Jetstream, bạn cần tiến hành cài đặt và build NPM dependencies và thực hiện migrate cơ sở dữ liệu:
npm install && npm run build && php artisan migrateCài đặt Socialite trong Laravel
Đầu tiên, để tích hợp tính năng xác thực với nhà cung cấp OAuth, chúng ta sẽ cài đặt thư viện Socialite bằng lệnh sau:
composer require laravel/socialiteChúng ta sẽ thêm thông tin OAuth của GitLab vào Laravel, những thông tin xác thực này sẽ được đặt tập tin config/services.php:
'gitlab' => [
    'client_id' => env('GITLAB_CLIENT_ID'),
    'client_secret' => env('GITLAB_CLIENT_SECRET'),
    'redirect' => env('GITLAB_CLIENT_REDIRECT'),
],
Tiếp theo, chúng ta cần chỉnh sửa cấu trúc bảng users để có thể lưu các thông tin GitLab vào hệ thống bằng lệnh sau:
php artisan make:migration add_gitlab_to_users_table --table=usersSau đó, hãy chỉnh sửa nội dung migrate trên trong thư mục database/migrations như sau:
<?php

use Illuminate\Database\Migrations\Migration;
use Illuminate\Database\Schema\Blueprint;
use Illuminate\Support\Facades\Schema;

return new class extends Migration
{
    /**
     * Run the migrations.
     */
    public function up(): void
    {
        Schema::table('users', function (Blueprint $table) {
            $table->string('gitlab_id');
            $table->string('gitlab_token');
            $table->string('gitlab_refresh_token')->nullable();
        });
    }

    /**
     * Reverse the migrations.
     */
    public function down(): void
    {
        Schema::table('users', function (Blueprint $table) {
            $table->dropColumn('gitlab_id');
            $table->dropColumn('gitlab_token');
            $table->dropColumn('gitlab_refresh_token');
        });
    }
};
Sau khi chỉnh sửa migrate, chúng ta sẽ chạy lệnh sau để chỉnh sửa cấu trúc bảng users:
php artisan migrateSau đó, chúng ta sẽ thêm các Column của GitLab vào $fillable của Model User trong thư mục app/Models như sau:
<?php
namespace App\Models;
...
class User extends Authenticatable
{
   ...
    protected $fillable = [
        ...
        'gitlab_id',
        'gitlab_token',
        'gitlab_refresh_token',
    ];
    ...
}
Tiếp theo, chúng ta sẽ tạo một Controller sẽ thực hiện xử lý đăng nhập GitLab bằng lệnh sau:
php artisan make:controller SocialAuthControllerSau khi chạy lệnh trên xong, hãy chỉnh sửa tập tin SocialAuthController.php trong thư mục app/Http/Controllers với nội dung như sau:
<?php

namespace App\Http\Controllers;

use Illuminate\Http\Request;
use Throwable;
use App\Models\User;
use Illuminate\Support\Facades\Auth;
use Illuminate\Support\Facades\Hash;
use Laravel\Socialite\Facades\Socialite;

class SocialAuthController extends Controller
{
    public function redirectToProvider($provider)
    {
        try {
            return Socialite::driver($provider)->redirect();
        } catch (Throwable $th) {
            report($th);
            return redirect()->route('login');
        }
    }

    public function handleProviderCallback($provider)
    {
        $user = self::createOrGetUser($provider);
        if ($user) {
            Auth::login($user);
            return redirect()->route('dashboard');
        }
        return redirect()->route('login');
    }

    public function createOrGetUser($provider)
    {
        try {
            $gitlab_user = Socialite::driver($provider)->user();
            return  User::updateOrCreate([
                'gitlab_id' => $gitlab_user->id,
            ], [
                'name'                 => $gitlab_user->name,
                'email'                => $gitlab_user->email,
                'gitlab_token'         => $gitlab_user->token,
                'gitlab_refresh_token' => $gitlab_user->refreshToken,
                'password'             => Hash::make('ManhDanBlogs') // Lưu ý: Bạn nên thay đổi thành password ngẫu nhiên để tăng tính bảo mật.
            ]);
        } catch (Throwable $th) {
            report($th);
            return false;
        }
    }
}
Chúng ta hãy thiết lập route cho hàm redirectToProvider và handleProviderCallback trong SocialAuthController.php trong tập tin routes/web.php như sau:
<?php

...
use App\Http\Controllers\SocialAuthController;
...
Route::get('auth/{social}', [SocialAuthController::class, 'redirectToProvider'])->name('social_redirect');
Route::get('auth/{social}/callback', [SocialAuthController::class, 'handleProviderCallback'])->name('social_callback');
Tiếp theo, chúng ta hãy thêm Application ID and Secret key của GitLab mà bạn đã tạo ở trên vào tập tin .env của dự án Laravel:
GITLAB_CLIENT_ID=xxxxx
GITLAB_CLIENT_SECRET=xxxxx
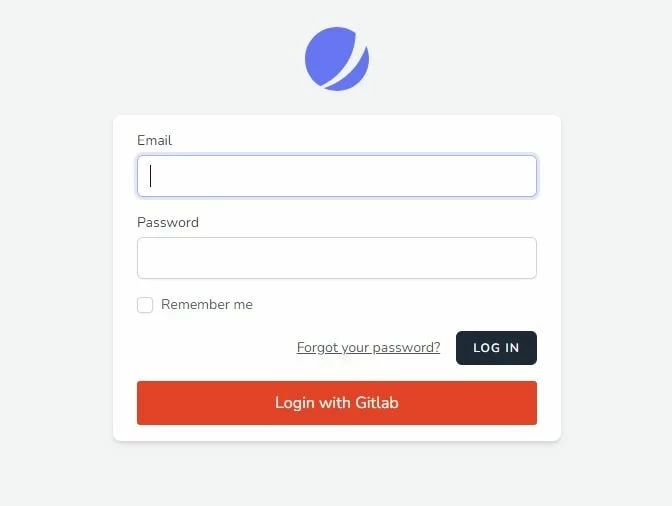
GITLAB_CLIENT_REDIRECT=https://laravel-socialite.manhdan.dev/auth/gitlab/callbackCuối cùng, chúng ta hãy chỉnh sửa tập tin login.blade.php trong thư mục views/auth với nội dung như sau:
<x-guest-layout>
    <x-authentication-card>
        <x-slot name="logo">
            <x-authentication-card-logo />
        </x-slot>

        <x-validation-errors class="mb-4" />

        @if (session('status'))
            <div class="mb-4 font-medium text-sm text-green-600">
                {{ session('status') }}
            </div>
        @endif

        <form method="POST" action="{{ route('login') }}">
            @csrf

            <div>
                <x-label for="email" value="{{ __('Email') }}" />
                <x-input id="email" class="block mt-1 w-full" type="email" name="email" :value="old('email')" required autofocus autocomplete="username" />
            </div>

            <div class="mt-4">
                <x-label for="password" value="{{ __('Password') }}" />
                <x-input id="password" class="block mt-1 w-full" type="password" name="password" required autocomplete="current-password" />
            </div>

            <div class="block mt-4">
                <label for="remember_me" class="flex items-center">
                    <x-checkbox id="remember_me" name="remember" />
                    <span class="ms-2 text-sm text-gray-600">{{ __('Remember me') }}</span>
                </label>
            </div>

            <div class="flex items-center justify-end mt-4">
                @if (Route::has('password.request'))
                    <a class="underline text-sm text-gray-600 hover:text-gray-900 rounded-md focus:outline-none focus:ring-2 focus:ring-offset-2 focus:ring-indigo-500" href="{{ route('password.request') }}">
                        {{ __('Forgot your password?') }}
                    </a>
                @endif

                <x-button class="ms-4">
                    {{ __('Log in') }}
                </x-button>
            </div>

            <div class="flex items-center justify-end mt-4">
                <a class="btn" href="{{ route('social_redirect', ['social' => 'gitlab']) }}" style="background: #e24329; color: #ffffff; padding: 10px; width: 100%; text-align: center; display: block; border-radius:3px;">
                    Login with Gitlab
                </a>
            </div>

        </form>
    </x-authentication-card>
</x-guest-layout>
Kết quả của công việc bạn đã làm đang chờ bạn khám phá!
Sau khi đã hoàn thành các bước trên, giờ là lúc để chúng ta sẽ cùng nhau khám phá thành quả công sức của mình.
Chúng ta sẽ tiến hành đăng nhập vào trang Laravel, và địa chỉ truy cập cụ thể như sau trong bài viết này:
https://laravel-socialite.manhdan.dev/loginĐây chính là thành quả của chúng ta sau khi thực hiện các bước ở phía trên 🤤🤤🤤🏆🍨🍨🍨.