
TinyMCE
TinyMCE là một trình soạn thảo WYSIWYG được xây dựng trên nền tảng Javascript, được phát triển dưới dạng mã nguồn mở theo giấy phép MIT bởi Tiny Technologies Inc.
TinyMCE cho phép người dùng tạo và định dạng văn bản trực tiếp trên trình duyệt web.
TinyMCE được thiết kế để tích hợp với các thư viện JavaScript như React, Vue.js, AngularJS và Bootstrap cũng như các hệ thống quản lý nội dung như Joomla và WordPress.
Images Upload Handler
images_upload_handler cho phép bạn chỉ định một hàm được sử dụng để thay thế hàm xử lý upload JavaScript mặc định của TinyMCE.
TinyMCE sử dụng XMLHttpRequest để upload từng hình ảnh lên server và resolves Promise bằng thuộc tính 'location' trong dữ liệu JSON mà server trả về là URL của hình ảnh đã upload.
Thực hiện Laravel TinyMCE Image Upload
Trước khi, bắt đầu thực hiện tính năng nay, bạn cần phải tích hợp TinyMCE vào Laravel bằng Laravel Vite (Phiên bản được áp dụng trong bài viết là Laravel 10).
Nếu bạn chưa thực hiện thì có thể tham khảo lại bài viết Integrating TinyMCE in Laravel 10 using Vite.
Laravel API Upload Images
Trước khi, chúng ta tích hợp tính năng upload hình ảnh vào TinyMCE 6, chúng ta cần phải chuẩn bị API upload hình ảnh bằng Laravel (Phiên bản được áp dụng trong bài viết là Laravel 10).
Để đảm bảo tính hợp lệ và an toàn của dữ liệu đầu vào khi người dùng upload hình ảnh, chúng ta sẽ tạo một Form Request mới có tên là UploadImageRequest bằng lệnh sau:
php artisan make:request UploadImageRequestSau khi chạy lệnh trên xong, chúng ta hãy chỉnh sửa tập tin UploadImageRequest.php nằm trong thư mục /app/Http/Requests với nội dung như sau:
<?php

namespace App\Http\Requests;

use Illuminate\Http\JsonResponse;
use Illuminate\Foundation\Http\FormRequest;
use Illuminate\Validation\ValidationException;
use Illuminate\Http\Exceptions\HttpResponseException;
use Illuminate\Contracts\Validation\Validator as ValidatorContract;

class UploadImageRequest extends FormRequest
{
    /**
     * Determine if the user is authorized to make this request.
     */
    public function authorize(): bool
    {
        return true;
    }

    /**
     * Get the validation rules that apply to the request.
     *
     * @return array<string, \Illuminate\Contracts\Validation\ValidationRule|array<mixed>|string>
     */
    public function rules(): array
    {
        return [
            'file' => 'bail|required|image|mimes:jpeg,png|mimetypes:image/jpeg,image/png|extensions:jpg,png|max:2048',
        ];
    }

    /**
     * Handle a failed validation attempt.
     *
     * @param  \Illuminate\Contracts\Validation\Validator  $validator
     * @return void
     *
     * @throws \Illuminate\Validation\ValidationException
     */
    public function failedValidation(ValidatorContract $validator)
    {
        $errors = (new ValidationException($validator))->errors();

        foreach ($errors as $key => $value) {
            $errors[$key] = reset($value);
        }

        $requests = [
            "error"  => [
                'message' => $errors['file'] ?? ''
            ],
        ];
        throw new HttpResponseException(response()->json($requests, JsonResponse::HTTP_BAD_REQUEST));
    }
}
Trong bài viết này, tôi sử dụng storage của Laravel, do đó cần phải tạo symbolic link từ thư mục public/storage đến storage/app/public bằng lệnh sau:
php artisan storage:linkĐể xử lý upload hình ảnh, chúng ta cần tạo Controller mới để thực hiện nhiệm vụ này. Hãy dùng lệnh dưới đây để tạo một Controller có tên là UploadController:
php artisan make:controller UploadControllerSau khi chạy lệnh trên xong, chúng ta hãy chỉnh sửa tập tin UploadController.php nằm trong thư mục /app/Http/Controllers với nội dung như sau:
<?php

namespace App\Http\Controllers;

use Illuminate\Http\JsonResponse;
use Illuminate\Support\Facades\Storage;
use App\Http\Requests\UploadImageRequest;

class UploadController extends Controller
{
    public function uploadImage(UploadImageRequest $request)
    {
        try {
            $name = $this->_getNameFile() . '.' . $request->file->getClientOriginalExtension();
            return response()->json([
                'location' => Storage::disk('public')->url($request->file->storeAs('images', $name, 'public'))
            ]);
        } catch (\Throwable $th) {
            report($th);
            return response()->json([
                'error' => [
                    'message' => 'HTTP/1.1 500 Server Error.'
                ]
            ], JsonResponse::HTTP_INTERNAL_SERVER_ERROR);
        }
    }

    /**
     * Generates a unique name for a file.
     *
     * @return string
     */
    private function _getNameFile()
    {
        # Generate a unique name using MD5 and timestamp
        $md5 = strtoupper(md5(uniqid() . microtime()));
        return substr($md5, 0, 8) . '-' . substr($md5, 8, 4) . '-' . substr($md5, 12, 4) . '-' . substr($md5, 16, 4) . '-' . substr($md5, 20);
    }
}
Cuối cùng, chúng ta hãy thiết lập route cho hàm uploadImage trong UploadController.php ở phía trên trong tập tin /routes/web.php như sau:
<?php

use Illuminate\Support\Facades\Route;
use App\Http\Controllers\UploadController;

/*
|--------------------------------------------------------------------------
| Web Routes
|--------------------------------------------------------------------------
|
| Here is where you can register web routes for your application. These
| routes are loaded by the RouteServiceProvider and all of them will
| be assigned to the "web" middleware group. Make something great!
|
*/

Route::get('/', function () {
    return view('welcome');
});

Route::post('images/upload', [UploadController::class, 'uploadImage']);
TinyMCE Upload Images
Đầu tiên, chúng ta cần phải thêm plugin Image vào TinyMCE. Để làm được điều này, chúng ta sẽ import plugin Image vào tập tin tinymce.js trong thư mục /resources/js:
import 'tinymce/plugins/image';Tiếp theo, chúng ta sẽ tiến hành viết mã nguồn để xử lý upload hình ảnh. Đoạn mã nguồn này sẽ được sử dụng cho option images_upload_handler của TinyMCE:
/* Import TinyMCE */
import tinymce from 'tinymce';

/* Default icons are required. After that, import custom icons if applicable */
import 'tinymce/icons/default/icons.min.js';

/* Required TinyMCE components */
import 'tinymce/themes/silver/theme.min.js';
import 'tinymce/models/dom/model.min.js';

/* Import a skin (can be a custom skin instead of the default) */
import 'tinymce/skins/ui/oxide/skin.js';

/* Import plugins */
import 'tinymce/plugins/advlist';
import 'tinymce/plugins/code';
import 'tinymce/plugins/emoticons';
import 'tinymce/plugins/emoticons/js/emojis';
import 'tinymce/plugins/link';
import 'tinymce/plugins/lists';
import 'tinymce/plugins/table';
import 'tinymce/plugins/image';

/* content UI CSS is required */
import 'tinymce/skins/ui/oxide/content.js';

/* The default content CSS can be changed or replaced with appropriate CSS for the editor content. */
import 'tinymce/skins/content/default/content.js';

window.addEventListener('DOMContentLoaded', () => {
    const images_upload_handler = (blobInfo, progress) => new Promise((resolve, reject) => {
        const xhr = new XMLHttpRequest();

        xhr.withCredentials = false;

        xhr.open('POST', '/images/upload');

        xhr.upload.onprogress = (e) => {
            progress(e.loaded / e.total * 100);
        };

        xhr.setRequestHeader("X-CSRF-TOKEN", document.querySelector('meta[name="csrf-token"]').getAttribute('content'));

        xhr.onload = () => {
            if (xhr.status === 403) {
              reject({ message: 'HTTP Error: ' + xhr.status, remove: true });
              return;
            }

            if (xhr.status < 200 || xhr.status >= 300) {
              reject('HTTP Error: ' + xhr.status);
              return;
            }

            const json = JSON.parse(xhr.responseText);

            if (!json || typeof json.location != 'string') {
              reject('Invalid JSON: ' + xhr.responseText);
              return;
            }

            resolve(json.location);
        };

        xhr.onerror = () => {
            reject('Image upload failed due to a XHR Transport error. Code: ' + xhr.status);
        };

        const formData = new FormData();

        formData.append('file', blobInfo.blob(), blobInfo.filename());

        xhr.send(formData);
    });

    tinymce.init({
        selector: 'textarea#tinymce',
        height: 500,
        plugins: 'advlist code emoticons link lists table image',
        toolbar: 'bold italic | bullist numlist | link emoticons | image',
        skin_url: 'default',
        content_css: 'default',
        images_upload_handler: images_upload_handler,
    });
});
Cuối cùng, chúng ta hãy mở tập tin welcome.blade.php trong thư mục resources/views và thêm thẻ meta bên dưới vào thẻ head như sau:
<!DOCTYPE html>
<html lang="en">
<head>
...
<meta name="csrf-token" content="{{ csrf_token() }}">
...
</head>
<body>
...
</body>
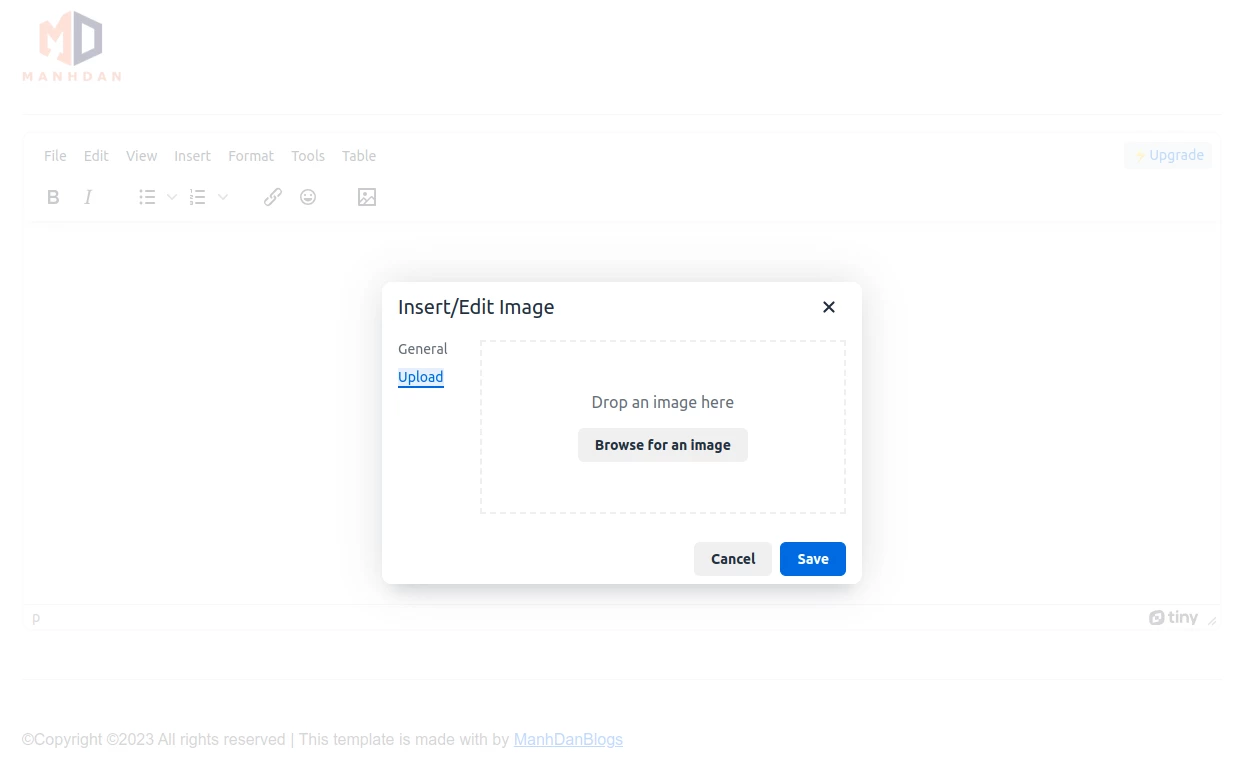
</html>Kết quả của công việc bạn đã làm đang chờ bạn khám phá!
Sau khi đã hoàn thành các bước trên, giờ là lúc để chúng ta cùng nhau khám phá thành quả công sức của mình.
Hãy thực thi lệnh sau để tiến hành build TinyMCE sử dụng Laravel Vite:
npm run buildCuối cùng, chúng ta hãy mở trình duyệt lên và truy cập vào địa chỉ http://127.0.0.1 để chiêm ngưỡng kết quả do chính bản thân chúng ta tạo ra 🤤🤤🤤🏆🍨🍨🍨.