
CKEditor 5
CKEditor 5 là một trình soạn thảo văn bản phong phú JavaScript với nhiều tính năng và khả năng tùy chỉnh.
CKEditor 5 có kiến trúc MVC hiện đại, mô hình dữ liệu tùy chỉnh và DOM ảo, mang lại hiệu suất và khả năng mở rộng vượt trội.
Tích hợp gốc với Angular, React và Vue.js có sẵn để thuận tiện cho bạn cũng như tương thích với Electron và các thiết bị di động (Android, iOS).
CKFinder 3
CKFinder 3 là trình quản lý tập tin được tích hợp với CKEditor 4 và CKEditor 5. Nó giúp bạn dễ dàng đưa các tập tin và hình ảnh vào nội dung của Editor một cách an toàn.
Đây là một tính năng có phí và bạn cần có một giấy phép để sử dụng nó, ngoài giấy phép thương mại của CKEditor của bạn.
Cài đặt CKFinder trong dự án Laravel
Trước khi, bắt đầu thực hiện tính năng nay, bạn cần phải tích hợp CKEditor vào Laravel bằng Laravel Vite.
Nếu bạn chưa thực hiện thì có thể tham khảo lại bài viết Integrating CKEditor 5 In Laravel 10 Using Vite.
Bài viết này, mình sẽ sử dụng Laravel 11. Nhưng các bạn đừng lo khi bài viết hướng dẫn tích hợp CKEditor 5 là Laravel 10 nha, vì bài viết này vẫn hoạt động bình thường trong phiên bản Laravel 11.
Đầu tiên, chúng ta sẽ cài đặt CKFinder thông qua lệnh Composer bên dưới:
composer require ckfinder/ckfinder-laravel-packageSau khi, cài đặt package trên chúng ta tiến hành download source CKFinder bằng lệnh sau:
php artisan ckfinder:downloadTiếp theo, tiến hành xuất bản assets và config kết nối CKFinder bằng lệnh sau:
php artisan vendor:publish --tag=ckfinder-assets --tag=ckfinder-configTrong bài viết này, tôi sử dụng storage của Laravel, do đó cần phải tạo symbolic link từ thư mục public/storage đến storage/app/public bằng lệnh sau:
php artisan storage:linkSau khi chạy lệnh trên xong, chúng ta sẽ thay đổi giá trị mục backends.default trong tập tin config/ckfinder.php như sau:
$config['backends']['default'] = array(
    'name'         => 'default',
    'adapter'      => 'local',
    'baseUrl'      => config('app.url').'/storage/',
    'root'         => storage_path('app/public'),
    // 'chmodFiles'   => 0777,
    // 'chmodFolders' => 0755,
    'filesystemEncoding' => 'UTF-8'
);
CKFinder mặc định sử dụng cơ chế bảo vệ CSRF dựa trên cơ chế của Double submit cookies.
Tuy nhiên, trong một số trường hợp, bạn có thể cần phải điều chỉnh cấu hình của Laravel để tránh việc mã hóa cookie do CKFinder tạo ra.
Để thực hiện việc này, hãy thêm cookie ckCsrfToken vào thuộc tính $except của middleware EncryptCookies:
// bootstrap/app.php

<?php

use Illuminate\Foundation\Application;
use Illuminate\Foundation\Configuration\Exceptions;
use Illuminate\Foundation\Configuration\Middleware;

return Application::configure(basePath: dirname(__DIR__))
    ...
    ->withMiddleware(function (Middleware $middleware) {
        $middleware->encryptCookies(except: [
            'ckCsrfToken',
        ]);
    })
    ...
Chúng ta cũng nên tắt tính năng bảo vệ CSRF của Laravel đối với đường dẫn của CKFinder, do CKFinder đã sử dụng cơ chế bảo vệ CSRF của riêng nó.
// bootstrap/app.php

<?php

use Illuminate\Foundation\Application;
use Illuminate\Foundation\Configuration\Exceptions;
use Illuminate\Foundation\Configuration\Middleware;

return Application::configure(basePath: dirname(__DIR__))
    ...
    ->withMiddleware(function (Middleware $middleware) {
        $middleware->encryptCookies(except: [
            'ckCsrfToken',
        ]);
        $middleware->validateCsrfTokens(
            except: ['ckfinder/*']
        );
    })
    ...
Việc xác thực kết nối với CKFinder trong Laravel được quản lý thông qua Middleware.
Tuy nhiên, trong một số trường hợp đặc biệt, bạn có thể cần tạo Middleware mới để đáp ứng nhu cầu riêng của dự án. Lệnh sau đây sẽ giúp bạn thực hiện điều đó:
php artisan make:middleware CKFinderMiddlewareSau đó, bạn hãy mở CKFinderMiddleware.php trong thư mục src/app/Http/Middleware và chỉnh sửa với nội dung sau:
<?php

namespace App\Http\Middleware;

use Closure;
use Illuminate\Http\Request;
use Symfony\Component\HttpFoundation\Response;

class CKFinderMiddleware
{
    /**
     * Handle an incoming request.
     *
     * @param  \Closure(\Illuminate\Http\Request): (\Symfony\Component\HttpFoundation\Response)  $next
     */
    public function handle(Request $request, Closure $next): Response
    {
        config(['ckfinder.authentication' => function() {
            return true;
        }]);
        return $next($request);
    }
}
Tiếp theo, bạn hãy thay đổi giá trị mục authentication trong tập tin config/ckfinder.php như sau:
$config['authentication'] = '\App\Http\Middleware\CKFinderMiddleware';Tích hợp CKFinder vào CKEditor bằng Laravel Vite
Ở bước này, chúng ta sẽ tiến hành tích hợp CKFinder vào CKEditor trong dự án Laravel bằng Laravel Vite.
Dưới đây là một danh sách plugin cần thiết cho mục đích này:
npm install --save @ckeditor/ckeditor5-image \
  @ckeditor/ckeditor5-adapter-ckfinder \
  @ckeditor/ckeditor5-ckfinder
Tiếp theo, chúng ta sẽ chỉnh sửa tập tin ckeditor.js trong thư mục src/resources/js với nội dung như sau:
import { ClassicEditor as ClassicEditorBase } from '@ckeditor/ckeditor5-editor-classic';
import { Essentials } from '@ckeditor/ckeditor5-essentials';
import { Autoformat } from '@ckeditor/ckeditor5-autoformat';
import { Bold, Italic } from '@ckeditor/ckeditor5-basic-styles';
import { BlockQuote } from '@ckeditor/ckeditor5-block-quote';
import { Heading } from '@ckeditor/ckeditor5-heading';
import { Link } from '@ckeditor/ckeditor5-link';
import { List } from '@ckeditor/ckeditor5-list';
import { Paragraph } from '@ckeditor/ckeditor5-paragraph';
import { Image } from '@ckeditor/ckeditor5-image';
import { CKFinderUploadAdapter} from '@ckeditor/ckeditor5-adapter-ckfinder';
import { CKFinder } from '@ckeditor/ckeditor5-ckfinder';


export default class ClassicEditor extends ClassicEditorBase {}

ClassicEditor.builtinPlugins = [
    Essentials,
    Autoformat,
    Bold,
    Italic,
    BlockQuote,
    Heading,
    Link,
    List,
    Paragraph,
    Image,
    CKFinderUploadAdapter,
    CKFinder,
];

ClassicEditor.defaultConfig = {
    toolbar: {
        items: [
            'heading',
            '|',
            'bold',
            'italic',
            'link',
            'bulletedList',
            'numberedList',
            'blockQuote',
            'undo',
            'redo',
            'ckfinder'
        ]
    },
    language: 'en'
};


ClassicEditor
    // Note that you do not have to specify the plugin and toolbar configuration — using defaults from the build.
    .create( document.querySelector( '#editor' ), {
        ckfinder: {
            // Upload the images to the server using the CKFinder QuickUpload command.
            uploadUrl: '/ckfinder/connector'
        }
    })
    .then( editor => {
        console.log( 'Editor was initialized', editor );
    } )
    .catch( error => {
        console.error( error.stack );
    } );
Để có thể sử dụng CKFinder trên một trang web, bạn cần phải bao gồm tập tin JavaScript chính của CKFinder.
Cách tốt nhất để thực hiện việc này là sử dụng hàm include() của Laravel. Hàm này sẽ tự động chèn tập tin JavaScript vào trang web của bạn.
@include('ckfinder::setup')Chúng ta sẽ thêm mã nguồn trên vào tập tin welcome.blade.php , sau khi chỉnh sửa tập tin welcome.blade.php sẽ có nội dung như sau:
<!DOCTYPE html>
<html lang="en">
<head>
<meta charset="utf-8">
<meta name="viewport" content="width=device-width, initial-scale=1">
<meta name="description" content="ManhDan Blogs">
<meta name="author" content="ManhDan Blogs">
<meta name="generator" content="ManhDan Blogs 0.84.0">
<title>CKEditor 5 – Classic Editor</title>
<link rel="icon" href="https://manhdandev.com/web/img/favicon.webp" type="image/x-icon"/>
<link href="https://cdn.jsdelivr.net/npm/[email protected]/dist/css/bootstrap.min.css" rel="stylesheet">
@vite(['resources/css/ckeditor.css', 'resources/js/ckeditor.js'])
@include('ckfinder::setup')
</head>
<body>
<div class="col-lg-8 mx-auto p-3 py-md-5">
<header class="d-flex align-items-center pb-3 mb-3 border-bottom">
<a href="https://manhdandev.com" class="d-flex align-items-center text-dark text-decoration-none" target="_blank">
<img src="https://manhdandev.com/web/img/logo.webp" width="100px" height="100px">
</a>
</header>
<main>
<div id="editor">
<p>This is some sample content.</p>
</div>
</main>
<footer class="pt-5 my-5 text-muted border-top">
©Copyright ©2023 All rights reserved | This template is made with
<i class="fa fa-heart-o"></i> by <a href="https://blog.dane.dev/" rel="noopener" target="_blank">ManhDanBlogs</a>
</footer>
</div>
<script src="https://cdn.jsdelivr.net/npm/[email protected]/dist/js/bootstrap.bundle.min.js"></script>
</body>
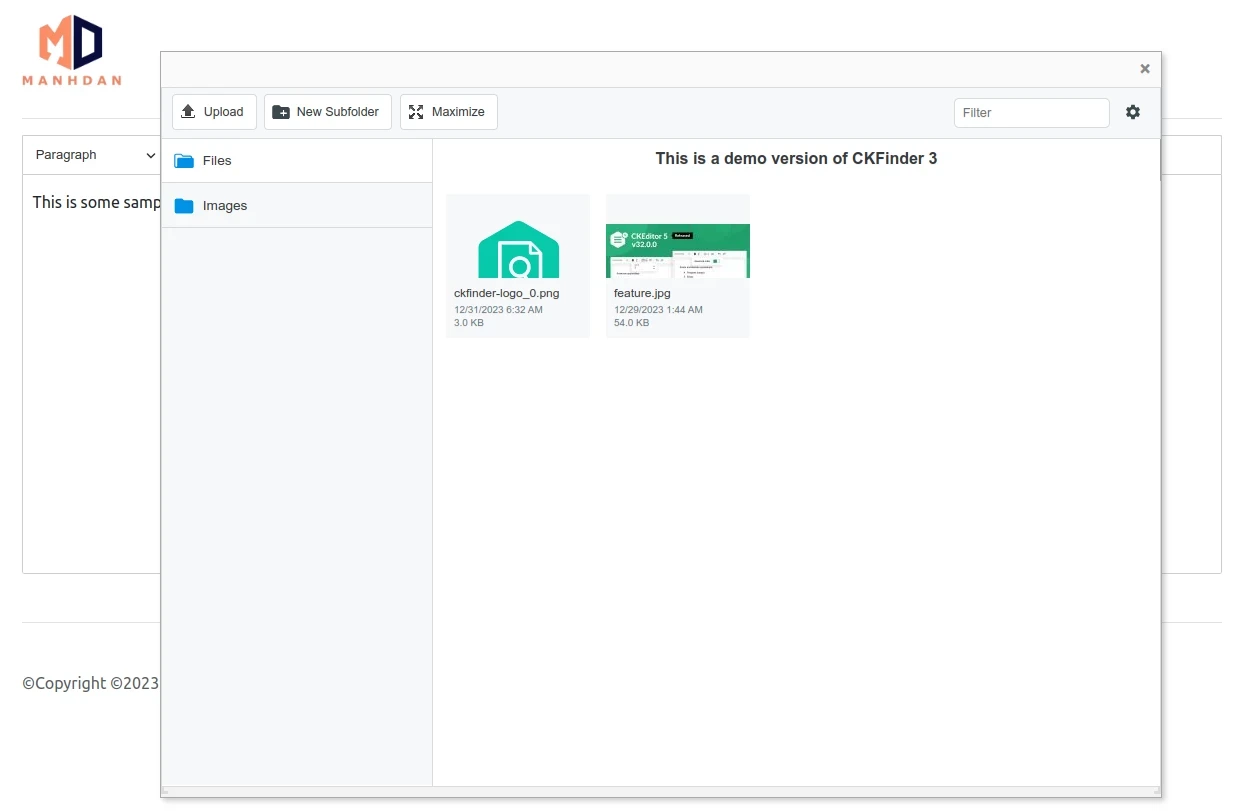
</html>Kết quả của công việc bạn đã làm đang chờ bạn khám phá!
Sau khi đã hoàn thành các bước trên, giờ là lúc để chúng ta cùng nhau khám phá thành quả của công sức mình.
Hãy thực thi lệnh sau để tiến hành tích hợp CKFinder vào CKEditor bằng Laravel Vite:
npm run buildCuối cùng, chúng ta hãy mở trình duyệt lên và truy cập vào địa chỉ http://127.0.0.1 để chiêm ngưỡng kết quả do chính bản thân chúng ta tạo ra 🤤🤤🤤🏆🍨🍨🍨.