
Laravel Reverb
Lần đầu tiên, Laravel ra mắt một official package cho phép bạn xây dựng một Websocket Server. Trước đây, chúng ta phải sử dụng package bên thứ 3 như Laravel Websocket.
Reverb được xây dựng dựa trên EventLoop của ReactPHP chứ không phải cơ chế Long Polling hoặc các cơ chế HTTP tương tự.
EventLoop của ReactPHP được xây dựng bằng stream_select của PHP để tạo thành ứng dụng Concurrency. Nhờ vậy, nó sẽ không phụ thuộc vào các extension hay bất kì thư viện nào bên ngoài.
Về cơ bản, Reverb có cơ chế hoạt động tương đồng với NodeJS (Sử dụng EventLoop để xử lý bất đồng bộ).
Setup Laravel Reverb Cơ Bản
Để tìm hiểu sâu thêm về Laravel Reverb, chúng ta sẽ thực hiện một demo cơ bản của việc sử dụng Reverb trong dự án Laravel (Phiên bản được áp dụng trong bài viết là Laravel 11).
Đầu tiên, chúng ta sẽ khởi tạo dự án Laravel mới. Bạn có thể làm điều này bằng cách sử dụng lệnh sau:
composer create-project laravel/laravel reverbSau đó, hãy chạy lệnh sau để tạo cấu trúc bảng cơ sở dữ liệu:
php artisan migrateTiếp theo, chúng ta sẽ cài đặt Laravel Reverb - WebSocket Server vào dự án Laravel:
php artisan install:broadcastingSau khi cài đặt Laravel Reverb, chúng ta sẽ tạo event tên là UserCreated bằng lệnh sau:
php artisan make:event UserCreatedBạn hãy mở tập tin UserCreated.php trong thư mục app/Events và chỉnh sửa nội dung như sau:
<?php

namespace App\Events;

use Illuminate\Broadcasting\Channel;
use Illuminate\Broadcasting\InteractsWithSockets;
use Illuminate\Broadcasting\PresenceChannel;
use Illuminate\Broadcasting\PrivateChannel;
use Illuminate\Contracts\Broadcasting\ShouldBroadcast;
use Illuminate\Foundation\Events\Dispatchable;
use Illuminate\Queue\SerializesModels;
use App\Models\User;

class UserCreated implements ShouldBroadcast
{
    use Dispatchable, InteractsWithSockets, SerializesModels;

    public $user;

    /**
     * Create a new event instance.
     */
    public function __construct(User $user)
    {
        $this->user = $user;
    }

    /**
     * Get the channels the event should broadcast on.
     *
     * @return array<int, \Illuminate\Broadcasting\Channel>
     */
    public function broadcastOn(): array
    {
        return [
            new Channel('user-created'),
        ];
    }
}
Phía Client, chúng ta sẽ cài đặt thư viện Laravel Echo để giúp chúng ta dễ dàng subscribe đến channels và lắng nghe events broadcast từ Server-side Broadcasting Driver.
Trong bài viết này, chúng ta sẽ cần cài thêm thư viện pusher-js vì Reverb sử dụng Pusher Protocol để subscriptions, channels và messages cho WebSocket.
npm install --save-dev laravel-echo pusher-jsTiếp theo, chúng ta sẽ xây dựng một giao diện đơn giản để có thể kiểm tra cách hoạt động của Laravel Reverb dễ dàng hơn.
Bạn hãy mở tập tin welcome.blade.php trong thư mục resources/views và chỉnh sửa nội dung như sau:
<!DOCTYPE html>
<html lang="en">
<head>
<meta charset="utf-8">
<meta name="viewport" content="width=device-width, initial-scale=1">
<meta name="description" content="ManhDan Blogs">
<meta name="author" content="ManhDan Blogs">
<meta name="generator" content="ManhDan Blogs 0.84.0">
<title>Laravel Reverb</title>
<meta name="csrf-token" content="{{ csrf_token() }}">
<link rel="icon" href="https://manhdandev.com/web/img/favicon.webp" type="image/x-icon"/>
<link href="https://cdn.jsdelivr.net/npm/[email protected]/dist/css/bootstrap.min.css" rel="stylesheet">
@vite(['resources/js/app.js'])
</head>
<body>
<div class="col-lg-8 mx-auto p-3 py-md-5">
<header class="d-flex align-items-center pb-3 mb-3 border-bottom">
<a href="https://manhdandev.com" class="d-flex align-items-center text-dark text-decoration-none" target="_blank">
<img src="https://manhdandev.com/web/img/logo.webp" width="100px" height="100px">
</a>
</header>
<main>
<table class="table">
<thead class="table-dark">
<tr>
<th>ID</th>
<th>Name</th>
<th>Email</th>
<th>Created</th>
<th>Updated</th>
</tr>
</thead>
<tbody>
<!-- Laravel Echo -->
</tbody>
</table>
</main>
<footer class="pt-5 my-5 text-muted border-top">
©Copyright ©2024 All rights reserved | This template is made with
<i class="fa fa-heart-o"></i> by <a href="https://blog.dane.dev/" rel="noopener" target="_blank">ManhDanBlogs</a>
</footer>
</div>
<script src="https://cdn.jsdelivr.net/npm/[email protected]/dist/js/bootstrap.bundle.min.js"></script>
<script>
window.addEventListener('load', function () {
Echo.channel('user-created')
.listen('UserCreated', (e) => {
var row = document.createElement("tr");
var cell1 = document.createElement("td");
cell1.textContent = e.user.id;
var cell2 = document.createElement("td");
cell2.textContent = e.user.name;
var cell3 = document.createElement("td");
cell3.textContent = e.user.email;
var cell4 = document.createElement("td");
cell4.textContent = e.user.created_at;
var cell5 = document.createElement("td");
cell5.textContent = e.user.updated_at;
row.appendChild(cell1);
row.appendChild(cell2);
row.appendChild(cell3);
row.appendChild(cell4);
row.appendChild(cell5);
document.querySelector("table tbody").appendChild(row);
});
})
</script>
</body>
</html>Cuối cùng, chúng ta sẽ biên dịch assets của dự án Laravel bằng lệnh sau:
npm run buildKết quả của công việc bạn đã làm đang chờ bạn khám phá!
Sau khi đã hoàn thành các bước trên, giờ là lúc để chúng ta cùng nhau khám phá thành quả của công sức mình.
Đầu tiên, chúng ta sẽ khởi động Laravel Reverb bằng lệnh sau:
php artisan reverb:startTiếp theo, chúng ta sẽ khởi động Laravel Queues bằng lệnh sau:
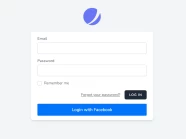
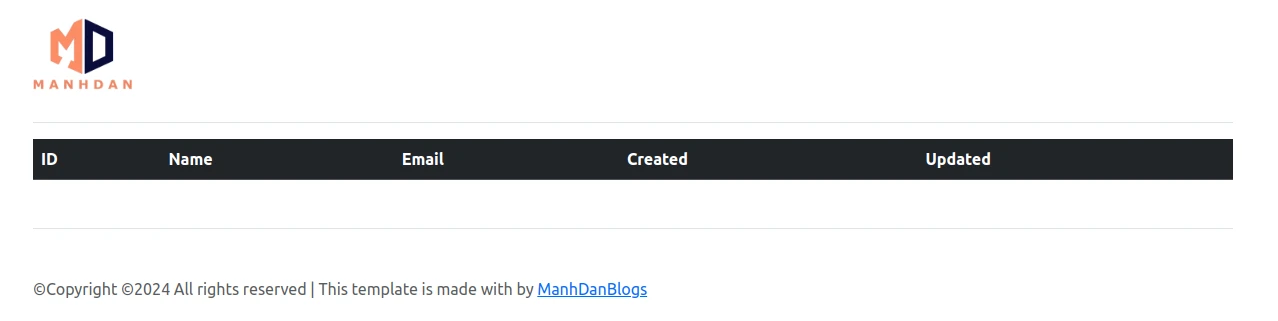
php artisan queue:workBạn mở trình duyệt lên và truy cập vào địa chỉ http://127.0.0.1, bạn sẽ thấy giao diện màn hình như bên dưới:
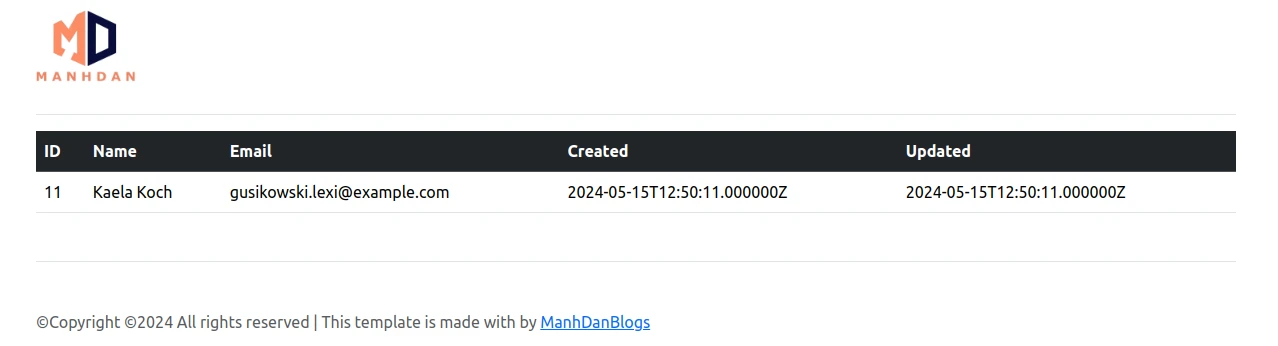
Cuối cùng, bạn cũng có thể sử dụng Tinker để Dispatch một sự kiện UserCreated:
php artisan tinker
App\Events\UserCreated::dispatch(App\Models\User::factory()->create())
Sau khi thực hiện lệnh trên, chúng ta sẽ nhận được kết quả như sau:
Tips Setup cho môi trường Production và Development
Môi trường Production
Đầu tiên, bạn hãy chỉnh sửa tập tin .env như sau:
REVERB_APP_ID=683437
REVERB_APP_KEY=tey9khuvx93qwoi5qhmi
REVERB_APP_SECRET=zcoq2m30qpj8ad5xlicf
REVERB_HOST="manhdandev.com"
REVERB_PORT=443
REVERB_SCHEME=https
Lưu ý: Bạn hãy nhớ thay đổi giá trị REVERB_HOST thành Domain của dự án Laravel của bạn.
Tiếp theo, bạn hãy cài đặt thêm Proxy vào cấu hình Nginx của dự án Laravel của bạn như sau:
location /app {
    proxy_http_version 1.1;
    proxy_set_header Host $http_host;
    proxy_set_header Scheme $scheme;
    proxy_set_header SERVER_PORT $server_port;
    proxy_set_header REMOTE_ADDR $remote_addr;
    proxy_set_header X-Forwarded-For $proxy_add_x_forwarded_for;
    proxy_set_header Upgrade $http_upgrade;
    proxy_set_header Connection "Upgrade";

    proxy_pass http://0.0.0.0:8080;
}
Môi trường Development
Nếu như môi trường Development của bạn xài HTTPS FAKE, mà bạn gặp trường hợp lỗi như sau:
[2024-05-15 11:06:18] local.ERROR: cURL error 60: SSL certificate problem: self-signed certificate (see https://curl.haxx.se/libcurl/c/libcurl-errors.html) for https://emme.dane.dev/apps/683437/events?
auth_key=tey9khuvx93qwoi5qhmi&auth_timestamp=1715771178&auth_version=1.0&body_md5=af060516c6190cac7d5b964a0814eb30&auth_signature=8f0e105
e00986340ed7c2c3693739301060d9bda179260d6362ddc07a9a3d747 {"exception":"[object] (GuzzleHttp\\Exception\\RequestException(code: 0): cURL error 60:
SSL certificate problem: self-signed certificate (see https://curl.haxx.se/libcurl/c/libcurl-errors.html) for https://emme.dane.dev/apps/683437/events?
auth_key=tey9khuvx93qwoi5qhmi&auth_timestamp=1715771178&auth_version=1.0&body_md5=af060516c6190cac7d5b964a0814eb30&auth_signature=8f0e105
e00986340ed7c2c3693739301060d9bda179260d6362ddc07a9a3d747 at /app/vendor/guzzlehttp/guzzle/src/Handler/CurlFactory.php:211)
Bạn hãy mở tập tin config/broadcasting.php và thêm phần setting bên dưới để có thể vượt qua lỗi trên một cách dễ dàng:
'reverb' => [
    ...
    'client_options' => [
        'verify' => false,
        // Guzzle client options: https://docs.guzzlephp.org/en/stable/request-options.html
    ],
],