Trong hướng dẫn này, tôi sẽ hướng dẫn bạn xây dựng chức năng đăng nhập trong Laravel. Công bằng mà nói thì bạn có thể sử dụng Laravel UI hoặc JetStream để tự động tạo ra chức năng đăng nhập trong Laravel. Điều này sẽ rất hiệu quả, nhưng với tinh thần học hỏi, chúng ta nên biết cách tự làm điều này.
Tạo ứng dựng Laravel
Đầu tiên, bạn hãy chạy lệnh command sau để cài đặt ứng dụng Laravel mới. Tuy nhiên, bạn có thể bỏ qua bước này, nếu bạn đã cài đặt trước đó rồi.
composer create-project --prefer-dist laravel/laravel laravel_demo_app
Tiếp theo, hãy chuyển đến thư mục sau
cd laravel_demo_app
Kết nối cơ sở dữ liệu
Bây giờ, bạn hãy thêm các thông tin cơ sở dữ liệu vào file .env để kết nối với cơ sở dữ liệu
DB_CONNECTION=mysql
DB_HOST=127.0.0.1
DB_PORT=3306
DB_DATABASE=auth
DB_USERNAME=root
DB_PASSWORD=
Tiếp theo, bạn chạy lệnh sau để tạo các bảng mặc định của Laravel
php artisan migrate
Sau đó, bạn mở file DatabaseSeeder.php nằm trong thư mục database/seeders và bạn hãy chỉnh sửa file giống như bên dưới
<?php

namespace Database\Seeders;

use Illuminate\Database\Seeder;

class DatabaseSeeder extends Seeder
{
    /**
     * Seed the application's database.
     *
     * @return void
     */
    public function run()
    {
        \App\Models\User::factory(10)->create();
    }
}
Tiếp theo, bạn chạy lệnh command sau để tạo data giả cho bảng users
php artisan db:seed
Thiết lập Auth Controller
Đầu tiên, bạn chạy lệnh sau để tạo controller mới có tên là AuthController
php artisan make:controller AuthController
Sau đó, bạn hãy mở file app\Http\Controllers\CustomAuthController.php và chỉnh sửa giống như bên dưới
<?php

namespace App\Http\Controllers;

use Illuminate\Http\Request;
use Illuminate\Support\Facades\Auth;

class AuthController extends Controller
{
    /**
     * Handle an authentication attempt.
     *
     * @param  \Illuminate\Http\Request $request
     * @return \Illuminate\Http\Response
     */
    public function login(Request $request)
    {
        if ($request->getMethod() == 'GET') {
            return view('auth.login');
        }

        $request->validate([
            'email'    => 'required|email',
            'password' => 'required',
        ]);

        $credentials = $request->only('email', 'password');

        if (Auth::attempt($credentials)) {
            $request->session()->regenerate();
            return redirect()->intended('home');
        }
        return back()->withErrors([
            'email' => 'The provided credentials do not match our records.',
        ]);
    }

    /**
     * Show the application's home.
     *
     * @return \Illuminate\View\View
     */
    public function home()
    {
        return view('home');
    }

    /**
     * Log the user out of the application.
     *
     * @param  \Illuminate\Http\Request $request
     * @return \Illuminate\Http\Response
     */
    public function logout(Request $request)
    {
        Auth::logout();
        $request->session()->invalidate();
        $request->session()->regenerateToken();
        return redirect()->route('login');
    }
}
Tạo Auth Routes
Bây giờ chúng ta phải thêm các route cần thiết để xử lý đăng nhập trong Laravel. Do đó, bạn hãy mở và thêm các route sau vào file routes/web.php
<?php

use Illuminate\Support\Facades\Route;
use App\Http\Controllers\AuthController;

/*
|--------------------------------------------------------------------------
| Web Routes
|--------------------------------------------------------------------------
|
| Here is where you can register web routes for your application. These
| routes are loaded by the RouteServiceProvider within a group which
| contains the "web" middleware group. Now create something great!
|
*/
Route::get('/', function () {
    return view('welcome');
});
Route::match(['get', 'post'], 'login', [AuthController::class, 'login'])->name('login');
Route::group(['middleware' => ['auth']], function () {
    Route::get('logout', [AuthController::class, 'logout'])->name('logout');
    Route::get('home', [AuthController::class, 'home'])->name('home');
});
Tạo Auth Blade View
Bạn cần tạo thư mục auth trong thư mục resources/views và tương tự như vậy, bạn một file mới có tên là login.blade.php, sau đó bạn thêm đoạn mã sau vào resources/views/auth/login.blade.php
<!DOCTYPE html>
<html lang="en">
<head>
    <title>ManhDanBlogs</title>
    <meta charset="utf-8">
    <meta name="viewport" content="width=device-width, initial-scale=1">
    <link rel="stylesheet" href="https://maxcdn.bootstrapcdn.com/bootstrap/3.4.1/css/bootstrap.min.css">
    <script src="https://ajax.googleapis.com/ajax/libs/jquery/3.5.1/jquery.min.js"></script>
    <script src="https://maxcdn.bootstrapcdn.com/bootstrap/3.4.1/js/bootstrap.min.js"></script>
</head>
<body>
<div class="container">
    <h2>Login Form</h2>
    <form action="{{ route('login') }}" method="POST">
        @csrf
        <div class="form-group">
            <label for="email">Email:</label>
            <input type="email" class="form-control" id="email" placeholder="Enter email" name="email">
            @error('email')
            <p class="text-danger">{{ $message }}</p>
            @enderror
        </div>
        <div class="form-group">
            <label for="pwd">Password:</label>
            <input type="password" class="form-control" id="pwd" placeholder="Enter password" name="password">
            @error('password')
            <p class="text-danger">{{ $message }}</p>
            @enderror
        </div>
        <div class="checkbox">
            <label><input type="checkbox" name="remember"> Remember me</label>
        </div>
        <button type="submit" class="btn btn-default">Submit</button>
    </form>
</div>
</body>
</html>
Trong thư mục resources/views bạn một file mới có tên là home.blade.php, sau đó bạn thêm đoạn mã sau vào resources/views/home.blade.php
<!DOCTYPE html>
<html lang="en">
<head>
    <title>Bootstrap Example</title>
    <meta charset="utf-8">
    <meta name="viewport" content="width=device-width, initial-scale=1">
    <link rel="stylesheet" href="https://maxcdn.bootstrapcdn.com/bootstrap/3.4.1/css/bootstrap.min.css">
    <script src="https://ajax.googleapis.com/ajax/libs/jquery/3.5.1/jquery.min.js"></script>
    <script src="https://maxcdn.bootstrapcdn.com/bootstrap/3.4.1/js/bootstrap.min.js"></script>
</head>
<body>
<div class="jumbotron text-center">
    <h1>Signed in</h1>
    <p>Welcome ManhDan Blogs!</p>
    <a href="{{ route('logout') }}" class="btn btn-danger" role="button">Logout</a>
</div>
</body>
</html>
Cuối cùng, bạn hãy trình duyệt lên và truy cập vào trang đăng nhập để trải nghiệm đi nào.
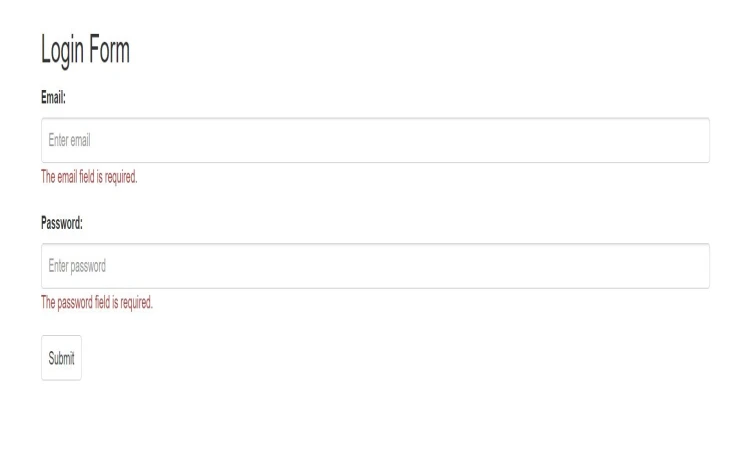
Hướng dẫn thực hiện chức năng đăng nhập trong Laravel đến đây là kết thúc thật dễ dàng và không cần sử dụng bất kì plugin hay package nào.
Tôi hy vọng bạn thích hướng dẫn này. Nếu bạn có bất kỳ câu hỏi nào hãy liên hệ với chúng tôi qua trang contact. Cảm ơn bạn.

