
Laravel Scout cung cấp một giải pháp đơn giản, dựa trên trình điều khiển để thêm tìm kiếm Full Text vào các mô hình Eloquent của bạn. Khi sử dụng Eloquent, Scout sẽ tự động giữ chỉ mục tìm kiếm của bạn đồng bộ với các bản ghi Eloquent của bạn.
Trong bài viết này, tôi sẽ hướng dẫn các bạn cách setting và cách sử dụng Laravel Scout với Algolia cơ bản nhất.
Đầu tiên, chúng ta cần tạo một dự án Laravel mới, sử dụng lệnh sau:
composer create-project --prefer-dist laravel/laravel laravel_scout
Tiếp theo, chúng ta sẽ kết nối với cơ sở dữ liệu như sau:
DB_CONNECTION=mysql
DB_HOST=127.0.0.1
DB_PORT=3306
DB_DATABASE=laravel_scout
DB_USERNAME=root
DB_PASSWORD=
Tiếp theo, chúng ta hãy chạy lệnh sau để tạo cấu trúc bảng cơ sở dữ liệu:
php artisan migrate
Tiếp tục, chúng ta sẽ cài đặt laravel/scout bằng lệnh sau:
composer require laravel/scout
Sau khi cài đặt laravel/scout, chúng ta hãy chạy lệnh sau để xuất bản cấu hình của Scout:
php artisan vendor:publish --provider="Laravel\Scout\ScoutServiceProvider"
Tiếp theo, chúng ta sẽ cài đặt driver cho Laravel Scout, ở đây chúng ta sẽ sử dụng driver Algolia, bạn hãy mở tệp .env và thêm các thuộc tính sau:
SCOUT_QUEUE=trueChúng ta tiếp tục cài đặt driver Algolia thông qua composer bằng lệnh sau:
composer require algolia/algoliasearch-client-php
Sau đó, bạn truy cập https://www.algolia.com/ để tạo một khoản Algolia:

Khi đăng kí tài khoản Algolia thành công, các bạn truy cập https://www.algolia.com/api-keys để lấy thông tin Application ID và Admin API Key:

Tiếp theo, mở tệp .env và thêm 2 thuộc tính sau:
ALGOLIA_APP_ID=application_id
ALGOLIA_SECRET=admin_api_key
Đến đây, chúng ta đã hoàn tất quá trình thiết lập laravel/scout, chúng ta còn chờ gì nữa, hãy trải nghiệm ngay và luôn nào.
Đầu tiên, chúng ta mở tệp User.php nằm trong thư mục app\Models và chỉnh sửa nó như sau:
<?php

namespace App\Models;

use Illuminate\Contracts\Auth\MustVerifyEmail;
use Illuminate\Database\Eloquent\Factories\HasFactory;
use Illuminate\Foundation\Auth\User as Authenticatable;
use Illuminate\Notifications\Notifiable;
use Laravel\Sanctum\HasApiTokens;
use Laravel\Scout\Searchable;

class User extends Authenticatable
{
    use HasApiTokens, HasFactory, Notifiable, Searchable;

    /**
     * The attributes that are mass assignable.
     *
     * @var string[]
     */
    protected $fillable = [
        'name',
        'email',
        'password',
    ];

    /**
     * The attributes that should be hidden for serialization.
     *
     * @var array
     */
    protected $hidden = [
        'password',
        'remember_token',
    ];

    /**
     * The attributes that should be cast.
     *
     * @var array
     */
    protected $casts = [
        'email_verified_at' => 'datetime',
    ];

    /**
     * Get the index name for the model.
    */
    public function searchableAs()
    {
        return 'user_index';
    }
}
Tiếp theo, chúng ta cần một controller để xử lý bằng cách chạy các lệnh sau:
php artisan make:controller TextSearchController
Sau khi tạo controller, chúng ta hãy mở controller trên và chỉnh sửa nó như sau:
<?php

namespace App\Http\Controllers;
use Illuminate\Http\Request;
use App\Http\Requests;
use App\Models\User;

class TextSearchController extends Controller
{
    /**
     * Display a listing of the resource.
     *
     * @return \Illuminate\Http\Response
     */
    public function index(Request $request)
    {
        if($request->has('user_search')){
            $users = User::search($request->user_search)->orderBy('id', 'DESC')->paginate(5);
        }else{
            $users = User::orderBy('id', 'DESC')->paginate(5);
        }
        return view('welcome', compact('users'));
    }

    /**
     * Store a newly created resource in storage.
     *
     * @param  \Illuminate\Http\Request  $request
     * @return \Illuminate\Http\Response
     */
    public function store(Request $request)
    {
        $this->validate($request,['name'=>'required', 'email'=>'required|email']);
        $data             = $request->all();
        $data['password'] = 'ManhDanBlogs';
        $user             = User::create($data);
        return back();
    }

    /**
     * Remove the specified resource from storage.
     *
     * @param  int  $id
     * @return \Illuminate\Http\Response
     */
    public function destroy($id)
    {
        $user = User::destroy($id);
        return back();
    }
}
Tiếp theo, mở tệp web.php và chỉnh sửa như sau:
<?php
use Illuminate\Support\Facades\Route;
use App\Http\Controllers\TextSearchController;
/*
|--------------------------------------------------------------------------
| Web Routes
|--------------------------------------------------------------------------
|
| Here is where you can register web routes for your application. These
| routes are loaded by the RouteServiceProvider within a group which
| contains the "web" middleware group. Now create something great!
|
*/
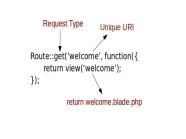
Route::resource('users', TextSearchController::class);Cuối cùng, chúng ta hãy mở file welcome.blade.php nằm trong thư mục resources\views và chỉnh sửa như sau:
<!DOCTYPE html>
<html>
<head>
    <link rel="stylesheet" href="https://maxcdn.bootstrapcdn.com/bootstrap/3.4.1/css/bootstrap.min.css">
    <script src="https://ajax.googleapis.com/ajax/libs/jquery/3.5.1/jquery.min.js"></script>
    <script src="https://maxcdn.bootstrapcdn.com/bootstrap/3.4.1/js/bootstrap.min.js"></script>
</head>
<body>
<div class="container">
    <h2>Add Data</h2>
    <form action="{{ route('users.store') }}" method="POST">
        @csrf
        @if ($errors->any())
        <div class="alert alert-danger">
            <ul>
                @foreach ($errors->all() as $error)
                <li>{{ $error }}</li>
                @endforeach
            </ul>
        </div>
        @endif
        <div class="form-group">
            <label for="email" class="form-label">Email</label>
            <input type="text" class="form-control" name="email">
        </div>
        <div class="form-group">
            <label for="name" class="form-label">Name</label>
            <input type="text" class="form-control" name="name">
        </div>
        <button type="submit" class="btn btn-default">Add</button>
    </form>
    <h2>Form Search</h2>
    <form action="{{ route('users.index') }}" method="GET">
        <div class="form-group">
            <input type="text" class="form-control" name="user_search" value="{{ request()->user_search }}">
        </div>
        <button type="submit" class="btn btn-default">Search</button>
    </form>
    <h2>Data Table</h2>
    <table class="table">
        <thead>
            <tr>
                <th>Name</th>
                <th>Email</th>
                <th>Created_at</th>
                <th>Action</th>
            </tr>
        </thead>
        <tbody>
             @foreach ($users as $user)
            <tr>
                <td>{{ $user->name }}</td>
                <td>{{ $user->email }}</td>
                <td>{{ $user->created_at }}</td>
                <td>
                    <form action="{{ route('users.destroy', ['user' => $user->id]) }}" method="POST">
                        @method('DELETE')
                        @csrf
                        <button type="submit" class="btn btn-danger">Delete</button>
                    </form>

                </td>
            </tr>
            @endforeach
        </tbody>
    </table>
    {{ $users->links() }}
</div>
</body>
</html>
Nếu chúng ta muốn tìm kiếm các bản ghi mà chúng ta đã xóa (xóa logic), hãy nhớ định cấu hình như sau trong tệp config/scout.php:
'soft_delete' => trueSau khi thay đổi cấu hình, bạn hãy sử dụng như sau:
$users = User::search($request->user_search)->withTrashed()->paginate(7);$users = User::search($request->user_search)->onlyTrashed()->paginate(7);Nếu chúng ta đã có dữ liệu, thì bạn cần nhập các bản ghi vào trình điều khiển tìm kiếm để nó có thể lập chỉ mục tìm kiếm. Scout cung cấp một phương thức nhập:
php artisan scout:import "App\Models\User"Ngược lại, phương thức flush sẽ xóa tất cả các bản ghi Model khỏi chỉ mục tìm kiếm:
php artisan scout:flush "App\Models\User"Còn nhiều chức năng khác, bạn có thể tìm hiểu thêm trong tài liệu của laravel: https://laravel.com/docs/8.x/scout